Want to achieve maximum impact with your technical photographs? This blog post describes how to conceptualize and capture your images.
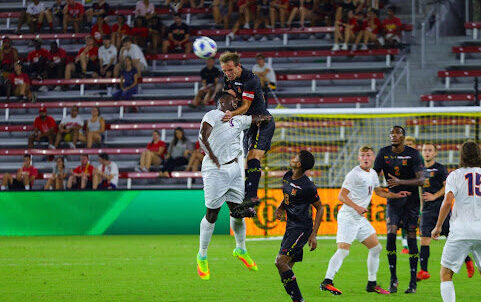
University of Maryland Men’s soccer player rises to win a defensive header off of a goal kick over a University of Virginia player. This image was part of a photojournalism application submitted to the University of Maryland’s student run newspaper, The Diamondback.
I sat down in the hard, wooden chair with my laptop on the table angled so that both of us could see the screen. It was the first time I was going to have my photography critiqued in a job interview and I didn’t know what to expect. I opened the first image file: an action shot I took during the University of Maryland Men’s soccer game the prior Thursday. My attention turned towards the gazing eyes of the interviewer. Without eye contact, the interviewer asked, “why did you choose to include ⅔ of player number 15 along the right edge of the image frame?” I remember being taken by surprise. Why was that the first question he asked? The subject of the photo was two players battling over a 50-50 ball framed in the center of the image. Did that not sufficiently achieve the purpose of the photo?
Maybe the purpose of the photo was obvious, but I didn’t have a good reason for including ⅔ of player number 15 in the image. In fact, I was mostly hung up on the wording of that first question. Specifically, the usage of the word “choose.” I hadn’t thought twice about that player when I framed, captured, edited, and shared that photo, let alone purposefully choose to include him in the image. The word, “choose,” implied a sequence of steps had occurred from planning the player’s presence in the frame, to reviewing the far-right edge of the image after capture, to consciously deciding that his presence added a favorable element to the image.
Thousands of shutter clicks later, I finally see where that interviewer was coming from. An image is analogous to an ensemble of musicians with various instruments. Every piece of real estate in an image contributes a unique sound. Only when each individual musician plays their instrument’s rhythm in syncopation with others will the audience perceive the true message intended by the musical director. Like a photographer, every musical director strives to convey their message noise-free in order to minimize the possibility of audiences becoming confused about the intended meaning of the final product they receive. Unlike a photographer, however, most musical directors attempt to perfect the delivery of a message written by someone else. It is the composer who crafts the blueprint for the message. They conceptualize what the intended message is in the first place. The photographer is responsible for both conceptualization of the message and perfecting its delivery so that their intended meaning reaches the viewer. Only when the photographer spends time and effort in this process will the final image truly sing.
While there are other definitions out there, I define a technical photograph as any image whose intended use case is to serve as an aide to describing a STEM-related object, or idea. The image of two men’s soccer players contesting for a ball is a very specific photographic context that does not fall into the definition of a technical photograph. Nevertheless, conceptualization of an image around an intended message is a generally applicable practice. Whether delivering a PowerPoint presentation to an advisor or preparing a peer-reviewed manuscript, an image of a hardware setup or a photograph of test samples after completion of an experiment can miss the mark if it was not thoughtfully planned.
When beginning to plan a technical photo, you will realize that your photograph will be captured either by a camera that is external to the research project or by a device that is a component of the research project itself. The photographer will typically have a greater number of possible avenues to explore in the first scenario for conveying their intended message. That said, it is important to acknowledge the following universal limitations to capturing quality technical photographs.
- You may have limited accessibility to framing perspectives due to physical space constraints.
- You may not be able to control lighting conditions due to risks of negatively impacting the research project.
- There is variability in the capabilities of the cameras being used to take technical photographs.
Clear identification of constraints is a useful first step in the conceptualization process to define the boundaries within which your photo must be designed. With these constraints in mind, you can continue to thoughtfully plan your technical photograph without overlooking barriers.
Next, you’ll want to identify the primary subject (foreground) of the shot. Ask yourself, “what do I want to be the center of attention and grab the viewer’s eyes first?” Your answer is the primary subject. Then, you’ll want to identify the supporting cast (background) of the shot. Ask yourself, “what other components, if any, are a part of what makes your primary subject perform its function?” Your answer identifies the background objects that should be present in your image. Finally, what emotion do you want your photograph to convey to the viewer? While you’re highlighting your primary subject and supporting cast by framing them in the field of view, you have a variety of options when it comes to how the viewer perceives these objects. Is there drama in the scene due to high contrast lighting? Is there a sense of simplicity being conveyed through rolling textures? There is infinite room for creativity here. This is where you can make the photograph truly unique.
I’ll share an example photograph that I spent some time planning out. During my master’s degree in the MIT Space Systems Laboratory, I built a hardware testbed to characterize an optical camera and inertial measurement unit. A CAD assembly of the setup is shown below.
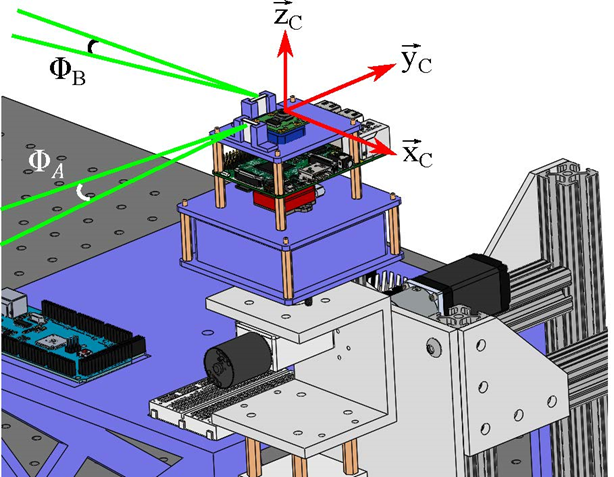
CAD rendering of hardware setup. This rendering enabled clear annotation of angles of interest. The view of this rendering mimics the perspective used to capture the photograph.
One of the components of the testbed was a laser metrology system used to make ground truth measurements of the orientation of the two sensors to determine uncertainty bounds for their measurements. The key to making these laser metrology measurements was determining the angle between the laser’s incident and reflected beams after encountering a planar mirror that was rigidly mounted to the sensor suite. My primary subject was the angle between the incident and reflected laser beam paths while the supporting cast to my shot was the planar mirror and sensor suite of the testbed. I wanted to convey the sense of how carefully-tuned the metrology system had to be to produce useable results since the purpose of the setup was to measure angles to an accuracy of under 0.5°. At the same time, I also wanted to draw the viewer’s attention immediately to the primary subject of the photo to avoid losing the viewer to less important features of the image. To accomplish this, I turned off the lights in the lab and placed my tripod such that my camera was elevated slightly above the testbed hardware. I framed the brightest part of the image, where the laser first encounters the mirror, front and center with a black backdrop behind it to avoid the possibility of distracting the viewer. The different path directions of the incident and reflected beams are easily discerned as the viewer’s eyes naturally follow the perceived source of the brightest spot of the image. I chose to include parts of the sensor suite towards the right half of the image with the vertical pins on the microcontroller and contours of the 3D printed support structure adding rigid textures to the frame. Finally, I also chose to let the laser beam be the sole source of illumination in the frame. While an external light source would’ve made for a less monochrome image, I felt that it would take away from the primary subject. The resulting image is shown below.
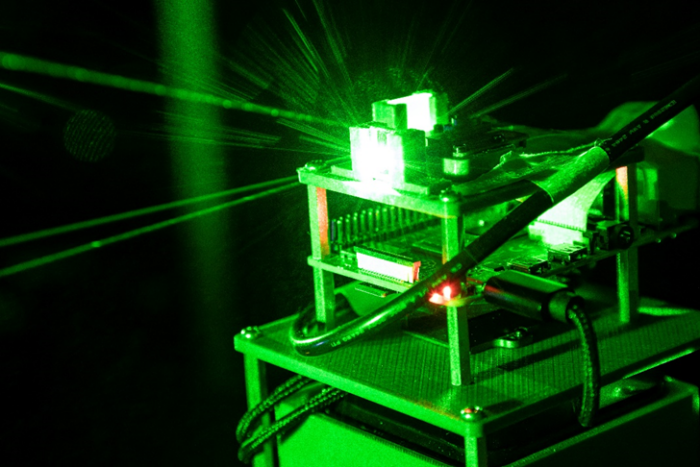
Photograph of hardware setup. Orientation of camera relative to subject enables clear distinction between incident and reflected laser beams. The laser beams provide the only illumination of the scene resulting in a dark, non-distracting background.
A little planning can go a long way when capturing technical photographs for your papers and presentations. Identifying constraints, the primary and background subjects, and thinking about how you want the viewer to perceive your photo, are a few steps you can take to producing technical imagery that effectively conveys your intended message.