Criteria for Success
- Show a title that attracts your audience.
- Make the main message stand out.
- Use strong figures and sparing text to support the main message.
- Practice your 20-second pitch.
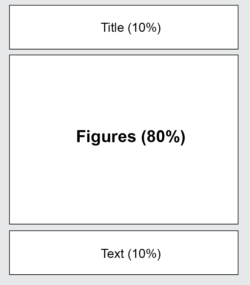
Structure Diagram
Identify your purpose
Your poster is a visual aid to spoken conversations you will have at a poster session. It should draw people to you, help them understand what you want them to understand, and support what you are saying while you talk to them. There are no hard-and-fast rules about what should or should not go on a poster, because everyone’s message is a bit different. Never add something just because you saw someone else using it. Think instead about what will be useful to you. To answer “Should I put my detailed protocol on my poster?”, ask yourself “Will that draw or deter my audience? Will it be useful to have on hand during a conversation? Or should I just have a copy of my protocol in my pocket instead? Do I want someone to be able to take a picture of it while I’m away from my poster?”
Before you start creating a poster it helps to ask yourself the following three questions:
- Why are you making this poster?
- A clear purpose defines a poster’s performance requirements, and defining this purpose is the easiest way to help you choose what information you need to include, and what information to emphasize. If your goal is “to hear critical feedback about the modeling in my planned manuscript,” then your poster must attract people who would also want to read your future paper, get them up to speed on why you’re doing what you’re doing, and present them with the critical problems you want feedback on.
- A vague purpose like “to tell people about what I’ve done” doesn’t help you design your poster. Even if you are just presenting a poster to get practice or for a requirement, you can take advantage of having a broad audience outside of your research lab, and aim to see if you can explain your work clearly without confusion, test your figures to see if they make sense, see how people react to some of your results, etc.
- When and where will this poster be used?
- Successful posters are designed for a targeted audience at a single type of event. Posters designed for multiple purposes (for example, for use during a conference and then for use as a stand-alone manuscript-on-a-wall) tend to do poor jobs on both fronts.
- Also, make sure to confirm the poster board dimensions for the specific event, especially for meetings abroad.
- How will this poster be used?
- In most cases, you will be standing next to your poster, in which case you will be using it in the same way people sometimes use a pen and paper, chalkboard, or slides to explain their ideas and results. Unlike a pen and paper, the figures and data are made in advance, and can be clean, detailed, and attractive.
- If you’re not standing next to your poster, what should it accomplish? Someone might email you; they might be impressed and remember your name; it might influence their research and the questions they ask might influence yours.
Analyze your audience
People at poster sessions are often bored and overwhelmed: there are many posters, most posters are full of details, and many presenters love to talk details. A successful poster gets across all the necessary information clearly and quickly. A successful poster helps to get a conversation started and opens the door for further conversation without overloading the audience, while a weak poster is a technical memo broken up into boxes, giving all details at once with way too much text in too small a font.
Skills
Compose a strong title
A strong title summarizes the main idea you want to get across. It should be so broad that, if you made it even a little more broad, it would stop being an interesting idea or a true representation of your work. To make a weak title into a strong title, pick out the key nouns and verbs, make them as general as possible, and link them together with as few words as possible. For example:
- The weak title ‘A novel optimization framework for household desalination systems based on electrodialysis that improves energy consumption, recovery, and salinity levels when desalinating brackish groundwater.”
- has the key nouns desalination, electrodialysis, recovery, household
- and the key verbs improving, and using (electrodialysis).
- Linking the key nouns and verbs produces the strong title ‘Improving the recovery of domestic water desalination devices using electrodialysis’.
Put your title in letters big enough to read from 15 feet away (which usually means at least 3/4″ tall font, but 1″ is better). Make the title as legible as possible: don’t use all caps, don’t use colored embossing, but do use high contrast colors. A solid color text on a white background is best.
Make the main message stand out
A poster session is a tough gig. If your poster is hard to understand, people will just move on. The best way to make your poster easy to understand is to make the main message stand out. Your main message should be the first thing someone sees and understands when they look at your poster, and it should be what they walk away remembering from your poster at the end of the day.
There isn’t one best way to make the main message stand out on every poster. Get creative! One powerful strategy is to put a big, beautiful figure right in the middle of the poster. Whether it shows your protocol, technology, or results, a good picture is worth much more than a 36″ x 36″ page full of text.
Arrange strong figures and sparing text for easy navigation
After you have figured out how to show your main message, you will need to support it. What’s the motivation? What are the implications? What approach did you take? The rest of your poster space is for answering questions like these. Aim to answer most of these questions with figures and short captions, and very sparing text. Bullet points are easier to read than paragraphs.
Most posters arrange their material into boxes with a navigation system that is intuitive (for the reader!) and goes from introduction to main result to implications, with details that are essential to the message but don’t fit in the flow relegated to the bottom or corners. Exactly which boxes you include depends on your message. It’s wise to label your boxes with sentences or phrases that convey the message of the box. A title like “Brackish groundwater in India” is far more informative than “Introduction”. If you can’t formulate a strong message-title for a box, it might mean that the box isn’t saying anything important!
Key tip: A great way to determine what you want to include is to practice your presentation before you even make your poster, and make a note of what you want to talk about, and in what order..
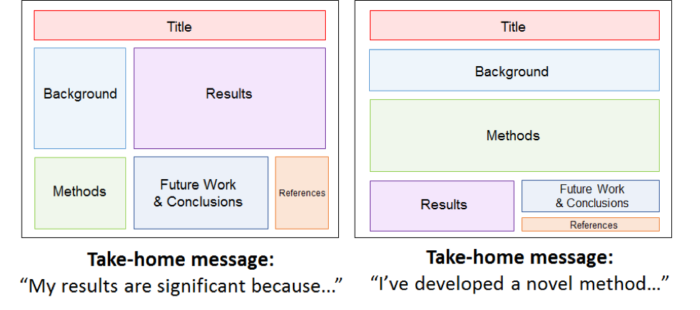
Here’s an example of two different poster layouts geared for different takeaway messages. On the left-hand poster, the results are emphasized, with significant room also on the background, methods, and future work. On the right-hand poster, the methods are emphasized instead. Maybe the work centers around a method, or making a device, or the research is newer and there are not that many results left to share. The posters are also both laid out in a coherent structure, with sections clearly moving from top to bottom or left to right, and clear divisions between sections. (Credit to L. Stopfer and G. Sun for the images.)
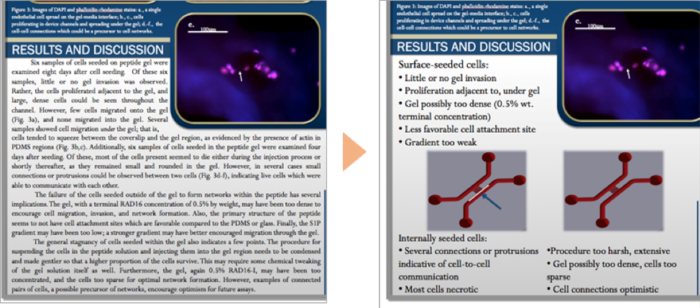
Within the poster, a great way to make your results clear is to replace blocks of text with images, and emphasize only key points with text. A good way to force yourself to do this is to keep a minimum font size of 32 pt, and don’t include any text smaller than that. (Credit to John Casey, BE Communication Lab, for the images)
Practice your 20-second pitch
The most common at a poster session is some variation on “So, what’s all this about?” The next 20 seconds is critical: a strong summary of your main message can spark a conversation, but a fumbling deluge of details can sink one. A strong pitch has five parts:
- Something that every single person in the room cares about
- Why we need to know/do more about that thing
- What you did in this project
- What your results mean
- How your results contribute to the thing everyone cares about
Here’s a pitch that can be comfortably delivered in 20 seconds:
- Waterborne diseases claim a large number of lives each year in the developing world
- One of the primary causes is the lack of affordable water filters…
- The aim of this project is to develop low-cost water filters based on plant tissues to filter out pathogens
- These filters could provide safe drinking water for people near the bottom of the economics pyramid
- …improving their everyday life
Practice your pitch, then refine it as you get to know your audience better.