Slides only make up part of your presentation. The other part is you! Practice speaking as early and as often as possible in the design process. Practicing with an audience can help you to fine tune your presentation and to become comfortable in the environment. Smoothly transition from practice to delivery by minimizing unknowns (and eliminating technical difficulties). Engage your audience and relax. Your work is exciting, and now you get to share that with an audience!
| Contents |
| 1. Practice 1.1. Start early 1.2. Speak clearly 1.3. Transition smoothly 2. Fine tune 2.1. Reduce visual distractions 2.2. Practice with an audience 2.3. Slow down 3. Deliver 3.1. Minimize unknowns 3.2. Engage your audience 3.3. Answer questions 4. Quick tips |
1. Practice
Practicing isn’t memorizing. Instead, practicing is similar to the editing process that a writer goes through with a manuscript; it allows you to rework your content and iron out transitions. This step is essential to a successful presentation.

Unlike writing a manuscript, however, you actually have to personally deliver your presentation—a step that many people reportedly dread. It might be uncomfortable at first, but every run-through is an opportunity to iterate and improve both your slides and your delivery. This will help you to become more confident and more likely to enjoy giving the presentation.
1.1. Start early
Do your first run-through as soon as possible. Content can be very different when spoken out loud compared to reading it or to thinking it through in your head. Use this first run-through to identify places that don’t work and gather information which will inform your next iteration of slide design.
1.2. Speak clearly
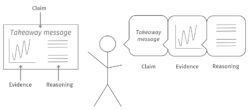
For a consistent message, there should be a strong overlap between what you say and what is on the slide. Use your voice like a laser pointer to guide your audience around the content and state explicitly what is on the slide. This is different, however, from simply reading your slides aloud to the audience. A good framework: First, state the key message. Next, say what you see and explain why it is important. Finally, transition to the next slide. Using this “Claim-Evidence-Reasoning” approach helps guide your audience through your research.

Also note that the beginning and the end of your presentation are the most important moments. For maximum impact, consider scripting out what you plan to say for the first and last slides. This can also help to overcome any nerves as you start the talk. Giving a presentation is like flying a plane; auto-pilot takes care of the majority of the flight, allowing you to focus on the take-off and landing.
1.3. Transition smoothly
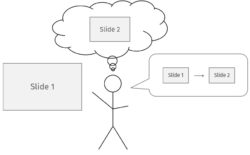
The connections between slides affect the continuity and clarity of your message. Practice your presentation focusing on the transitions to identify any gaps in your story. At any given point, you should know which slide will be next so you can connect the content on the current slide to the upcoming one. This is also a good opportunity to time yourself to see approximately how long your talk will take.

2. Fine tune
2.1. Reduce visual distractions
Focus the audience’s attention on your content by optimizing movement and gestures; any motions should be done with a purpose. Be aware of any habits you may have by recording one of your run-throughs. Laser pointers can distract your audience from what you are saying or might simply not work the day of your talk, so design your slides to be used without one. One option is to use labels to highlight important features.
2.2. Practice with an audience
Become familiar presenting your slides to actual people. This exercise will help you to become comfortable in the environment and reduces the uncertainty associated with the “live” showing of your presentation. Try to get an audience that is representative, including people who are not familiar with your work (this means people outside of your research group!).
2.3. Slow down
It is common for people to talk too fast when presenting. This can be due to nervousness or familiarity with the topic. Make sure you speak clearly and slowly to allow your audience time to understand what you are saying. Verbalizing the content on your slides, by saying what you see, is a good way to control the pace of your presentation. Silence can also be used as a device to increase the impact of your words.
3. Deliver
The day of your presentation is here! Although you can’t prepare for everything, there are a few ways you can set yourself up for success.
3.1. Minimize unknowns
Scope out the presentation venue before your actual talk. Determine the audio and visual logistics to avoid any technical difficulties on the day. How do you turn the projector on? Will you use your laptop or a dedicated computer? Do you need any adaptors? Will there be microphone(s)? Where will you stand? Do your slides have sufficient contrast and resolution? Can you see all the colors?
Arrive at the venue early to determine if there have been any changes in logistics. Test your presentation to confirm that your videos work and your figures load. Visualize the first minute of your talk: knowing how you will start will build your confidence and help create a powerful first impression. To calm your nerves, focus on slow, deep breaths.
3.2. Engage your audience
Set up your laptop such that you can see the slides and the audience simultaneously. This arrangement ensures that you never have to turn your back on the audience to see your slides. When speaking, project to the back of the room and try to make eye contact with different members of the audience. Use your voice to convey how interesting and exciting your work is!
3.3. Answer questions
When designing your presentation, anticipate questions that may arise. You can prepare back-up slides with visuals to aid your explanations. Also consider how you will navigate backwards through your slides—click-through slides can sometimes make it impossible to get to the relevant point in your presentation. Links at the beginning or end of the presentation can help with this. PowerPoint also has a feature that allows you to view your slides in “sorter” mode so you can jump to the desired spot without flashing all your slides to the audience.
During the question and answer session, listen to the entire question, then repeat it back to the inquirer. This serves many purposes: it clarifies that you have understood the question correctly; it ensures that the rest of the audience has heard the question; and it also buys you some time to formulate a coherent response. Take a breath and a moment to think before answering the question.
4. Quick tips
- Be realistic about your timing. It is far better to have a talk that is slightly too short than to have one that is too long.
- Make sure you leave time for questions after your talk. These discussions are often the most valuable part of the presentation.
- To calm nerves, try speaking directly to friendly members of the audience (this may be an enthusiastic listener or friends from your research group).
- Consider what you plan to wear. Dress comfortably but professionally, in whatever makes you feel confident. Check with peers or the event organizer to confirm what is appropriate for the specific presentation.
- Prepare for contingencies with backup copies of your slides on another computer or flash drive, extra batteries for your clicker, etc.
Additional resources
- The Biological Engineering Communication Lab has additional CommKit resources:
- Giving Oral Presentations from Scitable by Nature Education
- Fun reading: Confessions of a Public Speaker by Scott Berkun, Talk Like TED by Carmine Gallo
To practice your delivery and receive feedback, make an appointment with us. We’d love to help!
